
DSL MODEM IP = 192.168.1.1
MIKROTIK LAN IP = 10.0.0.1
SQUID LAN IP = 192.168.2.1
I assume that you already have working Mikrotik in place, and Already configured SQUID Server ready, (You can search guides about there configurations at my blog), I will just show you how to interconnect them together so All users browsing port 80 request will go to SQUID for caching facility)
We will divide this article in two sections.
1# MIKROTIK CONFIGURATION
2# SQUID CONFIGURATION
1# MIKROTIK CONFIGURATION
Mikrotik Have 3 Interfaces.ether1 = 10.0.0.1
Connected to LAN
ether2 = 192.168.2.2
Connected Directly to PROXY’s eth0 via crossover cable.
ether3 = 192.168.1.2
Connected Directly to WAN/DSL
As shown in the image below . . .

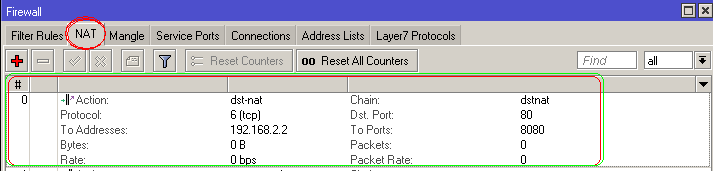
Open New Terminal and create new NAT rule to redirect port 80 traffic to SQUID proxy server. Command as follows.
1 | /ip firewall nat |
2 | add action=dst-nat chain=dstnat disabled=no dst-port=80 protocol=tcp to-addresses=192.168.2.1 to-ports=8080 |
As shown in the image below . . .

That’s it for mikrotik configuration, moving on to squid
2# SQUID CONFIGURATION
SQUID PROXY SERVER have two Interfaceseth0 = 192.168.2.1
Connected Directly with Mikrotik’s PROXY interface via crossover cable.
eth1 = 192.168.1.3
Connected Directly with WAN/DSL
Note: I Will not discuss howto configure SQUID here as it have already been well described in my other articles as follows, Therefore I assume you have already configured SQUID and must be running it in TRANSPARENT mode (using squid.conf directives and iptables)
Add the following line in /etc/squid/squid.conf
1 | # PORT and Transparent Option |
2 | http_port 8080 transparent |
1 | iptables -t nat -A PREROUTING -i eth0 -p tcp --dport 80 -j DNAT --to 192.168.2.1:8080 |
For more information, Read the below . . .
Now Try to Browse, and at Proxy Server , Monitor SQUID Log by following command
1 | tail -f /var/log/squid/access.log |
As shown in the image below . . .

If you want to log USER’s Original IP address instead of Mikrotik, Either add route in Squid server for your local user subnet pointing to mikrotik proxy interface, OR you have to use Packet Marking + ROUTING method as described in the following article.
1 | http://aacable.wordpress.com/2011/07/21/mikrotik-howto-redirect-http-traffic-to-squid-with-original-source-client-ip/ | |
Regard’s
Title : Howto add SQUID Proxy Server with MIKROTIK
Description : To add SQUID Proxy Caching Server support in Mikrotik, Assuming the following Scenario. DSL MODEM IP = 192.168.1.1 MIKROTIK LAN IP = 10.0....
Description : To add SQUID Proxy Caching Server support in Mikrotik, Assuming the following Scenario. DSL MODEM IP = 192.168.1.1 MIKROTIK LAN IP = 10.0....
0 Response to "Howto add SQUID Proxy Server with MIKROTIK"
Posting Komentar